Category

Latest News

UV Printing vs Traditional Digital When to Invest in Texture and Vibrancy - Blog Image

UV Printing vs. Traditional Digital: When to Invest in Texture and Vibrancy

By Latest News No Comments

There was a time, not too long ago, when “digital printing” was a one-size-fits-all term. You sent a file to a printer, ink hit paper, it dried, and you moved on. But as anyone in the marketing world can tell you, the bar for “good enough” has moved. We are now in an era where consumers are overwhelmed by flat, matte images on their screens and in their letterboxes.

This is where the choice between UV printing and traditional digital methods becomes a genuine business strategy. It’s no longer just about putting ink on a page; it’s about how that page feels in a client’s hand and how long it stays in their memory.


The Science Under the Hood: Why it Matters to You

To understand the value, we have to look at the “dry time” problem. Traditional digital printing—the kind using solvent or aqueous inks—relies on absorption. The ink is essentially a liquid that needs to soak into the fibres of a material or have its carrier liquid evaporate. This is why, if you’ve ever touched a freshly printed poster and had it smudge, you’re seeing traditional digital ink that hasn’t “set” yet.

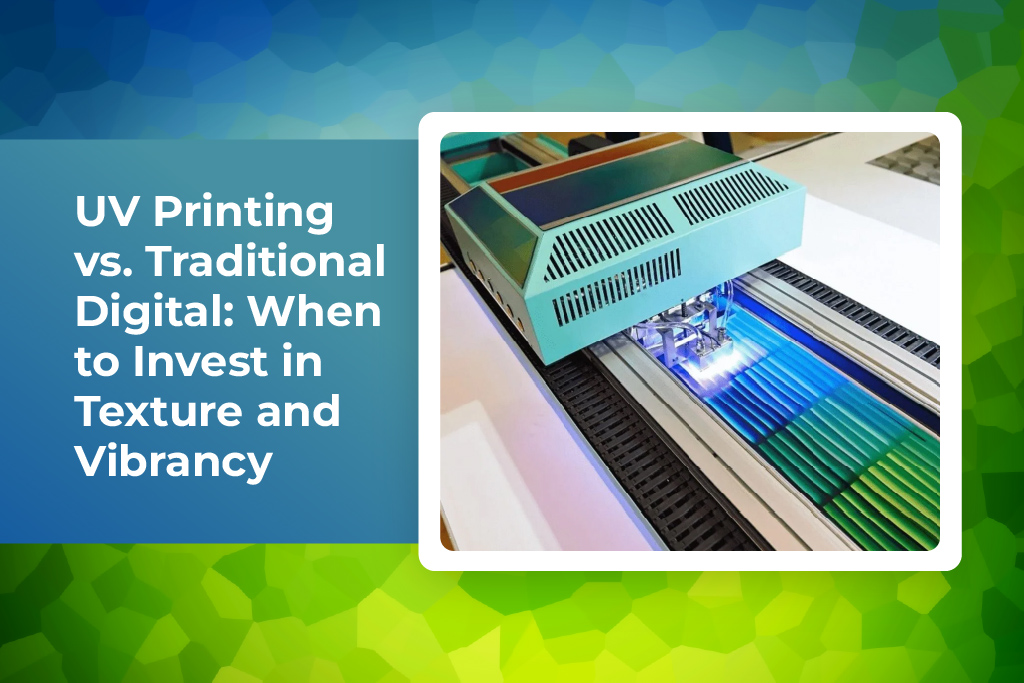
UV printing flips this script entirely through a process called photopolymerisation. Instead of waiting for the air to dry the ink, the printer uses high-intensity ultraviolet lights to “cure” the ink the very second it touches the surface.

This creates a massive shift in what’s possible. Because the ink turns into a solid film instantly, it doesn’t have time to soak into the paper and lose its “pop.” It stays on top, sitting proud of the surface. This lack of “dot gain” is why UV prints look so much sharper—the ink stays exactly where the nozzle put it.

Did you know? The “instant cure” of UV printing actually makes it one of the fastest production methods available. Because there is no degassing or drying time required, a job can go straight from the printer to the cutting table or the delivery van, cutting days off a standard production schedule.


The “Touch” Factor: Why Texture is the New Premium

We often talk about the “visual landscape” (pardon the pun), but we rarely talk about the tactile one. Humans are wired to touch things. When we receive a business card or a product package, our fingers are subconsciously scanning for quality.

Traditional digital printing is fundamentally flat. If you want texture, you usually have to pay for a second process like embossing. UV printing, however, allows for tactile marketing by simply “stacking” layers of ink. By printing multiple passes of clear gloss or white ink, we can create a raised texture that you can feel with your thumb.

Imagine a brochure for a luxury car where you can actually feel the grain of the leather seats on the page, or a wine label where the grapes feel round and smooth against a matte paper background. This 3D effect creates a sensory “hook” that a flat, traditional print simply cannot match. It’s a way to prove your brand’s attention to detail before the customer has even read a single word of your copy.

You may also like:


Colour That Refuses to Fade into the Background

If you’ve ever seen a shop window sign that looks “washed out” after just a few months in the Australian sun, you’ve seen the limitations of traditional inks. Solvent-based inks are prone to fading because the pigments are thinner.

UV-curable inks are built differently. Because they are essentially a cured plastic film, they are incredibly dense. This leads to a level of colour saturation and vibrancy that is difficult to achieve otherwise.

One of the most useful tools in the UV arsenal is white ink. In traditional printing, “white” is just the absence of ink—you rely on the white paper to provide the highlights. But what if you want to print a vibrant logo onto a piece of dark timber or a sheet of black acrylic? Traditional digital ink would just disappear. UV printers can lay down a heavy, opaque white base first, acting as a primer so the colours on top remain “true” and bright.


Printing on… Well, Anything

This is perhaps the biggest “wow” factor of UV technology: substrate versatility. Traditional digital printing is picky. It likes paper, certain types of vinyl, and some fabrics. Try to print a logo on a glass bottle or a metal power bank with a standard inkjet, and the ink will simply bead up and slide off.

Because UV ink is cured by light rather than absorption, it doesn’t care what it’s sitting on. In the last year, we’ve seen a massive surge in businesses customising:

  • Promotional Gifts: Direct-to-object printing on metal pens, bamboo lunchboxes, and ceramic tiles.
  • Industrial Signage: Printing safety instructions directly onto brushed aluminium or heavy-duty plastics.
  • Interior Décor: Custom-printed glass splashbacks for offices or textured wood-grain finishes on MDF furniture.

If the object can fit under the print head and it’s relatively flat, you can likely print on it with UV.

Did you know? UV printing is the primary technology used to create high-quality Braille for public signage. Because the ink can be built up to a specific, consistent height, it allows for durable, weather-resistant tactile lettering that meets strict accessibility standards.

You may also like:


The Sustainability Conversation

We’re all becoming more conscious of the environmental footprint our businesses leave behind. This is another area where the investment in UV pays off.

Traditional solvent printers release Volatile Organic Compounds (VOCs). That “smell” of a print shop? That’s chemicals evaporating into the air. While modern solvent printers are much better than they used to be, they still require ventilation and careful handling.

UV inks are solvent-free. Since they cure instantly through light, there is no evaporation and no gas released into the atmosphere. Furthermore, the shift from mercury vapour lamps to LED UV curing has slashed the power consumption of these machines. For a brand that wants to talk about its “green” credentials, choosing a low-VOC, energy-efficient printing method is a strong piece of evidence to back up those claims.

You may also like:


When is Traditional Digital the Right Choice?

It would be dishonest to say UV is the best choice for every single job. There are still times when the “old way” is the better way, usually dictated by two things: volume and flexibility.

  1. Mass Production on a Budget: If you are printing 10,000 basic flyers that people will look at once and throw in the bin, the premium cost of UV ink isn’t necessary. Standard digital printing is incredibly efficient and cost-effective for high-volume, short-term paper products.

  2. Extreme Flexibility: UV ink is a cured film, which means it can be slightly more “brittle” than solvent inks. If you are wrapping a vehicle with complex curves and deep recesses, the “stretchy” nature of traditional solvent-based vinyl is often preferred by installers to ensure the wrap doesn’t crack or lift over time.


Key Points to Remember:

  • Texture is a differentiator: Use raised UV ink to make your brand literally stand out.
  • Durability is built-in: UV prints are naturally scratch and fade-resistant.
  • Versatility is king: Don’t limit yourself to paper; consider wood, metal, or acrylic for your next campaign.
  • Eco-conscious: UV printing is a cleaner, lower-emission choice for sustainable branding.
Shelf Impact Designing Product Packaging That Stops Scrolling and Stops Walking - Blog Image

Shelf Impact: Designing Product Packaging That Stops Scrolling and Stops Walking

By Latest News No Comments

In a world overflowing with choice, where the next click is always a fraction of a second away and the supermarket aisle stretches into an endless mosaic of brands, a product has mere moments to capture attention. This isn’t an exaggeration; it’s the stark reality of consumer behaviour. Whether someone is idly scrolling through an online marketplace on their phone or navigating the crowded aisles of a physical store, your product packaging has roughly three seconds to make an impression. It needs to compel a stop, a tap, or a pickup.

This isn’t about mere aesthetics; it’s about strategic design that functions as your most potent silent salesperson. Effective custom packaging design is the critical intersection of art, psychology, and commerce, directly influencing consumer purchase behaviour and delivering significant packaging ROI. It’s the visual handshake and the tactile experience that communicates value, quality, and brand identity long before a sale is made.


The 3-Second Rule: Your Brand’s Moment of Truth

The ubiquity of choice has trained consumers to be ruthlessly efficient in their decision-making. Faced with overwhelming options, the human brain seeks shortcuts, relying heavily on visual cues. On a digital platform, this translates to rapid scrolling, where only the most compelling thumbnails break the endless feed. In a physical store, it means a swift glance across a shelf, singling out what is distinctive amongst the competitors.

This phenomenon is often termed the “3-Second Rule.” It’s the precious window where your packaging must cut through the visual noise and grab attention. Fail here, and your product remains invisible, regardless of its intrinsic quality or innovative features. Succeed, and you earn the opportunity to tell your brand story, justify your price point, and ultimately, convert interest into a sale. Packaging, therefore, isn’t just a container; it’s the frontline of your brand’s battle for attention.


Stopping the Scroll: Mastering the Digital Shelf

The digital marketplace has fundamentally reshaped packaging priorities. A product primarily experienced as a thumbnail on a smartphone screen demands a different approach than one primarily encountered in a physical store. The challenge here is to create E-commerce packaging solutions that are compelling even when they are not physically present.

Consider the journey of an online shopper. They are likely on a mobile device, often multitasking, scanning search results or social media feeds. Your product appears as a small square, competing with dozens, if not hundreds, of others. This is why thumbnail-ready design is paramount. High-contrast colours, bold typography, and clear product imagery become non-negotiable. The product’s primary benefit or identity must be instantly legible, even when scaled down. Intricate details, subtle textures, and delicate gradients that might shine in person often get lost in the digital ether. Simplicity, clarity, and immediate recognition are the hallmarks of effective online packaging.

Stopping the Scroll - Mastering the Digital Shelf - Blog Image

Furthermore, the rise of social commerce means packaging now plays a vital role in user-generated content (UGC). The unboxing experience has become a phenomenon, with consumers sharing their product reveals across platforms like TikTok and Instagram. Thoughtful internal packaging, tissue paper, custom inserts, and even the “reveal” sequence itself, transform a simple delivery into a shareable event. Brands that design with the unboxing moment in mind are essentially creating free, authentic marketing content. This extends beyond the product itself to the shipping container—making it durable, protective, and branded without being excessive or wasteful.


Did You Know? 

Research from Dotcom Distribution found that 40% of consumers would share an image of a delivery on social media if it came in unique packaging. This highlights the measurable ROI of designing for the unboxing experience.


Stopping the Walk: Dominating the Physical Shelf

While online sales continue to surge, the physical retail environment remains a critical battleground for many brands. Here, packaging must engage multiple senses and withstand the rigours of the retail shelf impact environment. Unlike the digital space, where a scroll takes you away, the physical aisle demands a tangible interaction.

The “Billboard Effect” is a powerful concept in physical retail. When multiple units of a product line are stacked together, their collective packaging should create a cohesive visual block that stands out amidst the fragmented patterns of competitors. This requires consistent branding, complementary colour palettes, and a unified design language across all SKU rationalization. The goal is to create a visual magnet that draws the eye and holds it, stopping the casual walker.

Beyond the visual, tactile branding is a game-changer. The moment a customer reaches out and touches a product, a deeper connection is formed. Think about the difference between a smooth, glossy finish and a textured, matte one; an embossed logo versus a flat print. These subtle tactile cues can communicate luxury, earthiness, ruggedness, or innovation without a single word. Psychologically, picking up a product significantly increases the likelihood of purchase—some studies suggest by as much as 70%. Substrate selection, therefore, becomes crucial; whether it’s recycled cardboard, premium soft-touch paper, or innovative bio-plastics, the material itself tells a story.

Colour psychology also plays a significant role in influencing emotion and perception at the point of sale. Bright colours can convey energy and affordability, while muted tones might suggest sophistication or natural ingredients. The hierarchy of information on the physical pack is another strategic consideration: what is the absolute first thing a customer needs to see to understand and desire your product? Is it the brand name, a key benefit, the flavour profile, or a unique selling proposition? This requires meticulous dielines and prototypes to ensure every element is perfectly positioned for maximum impact.


Did You Know?

Eye-tracking studies in retail environments have shown that consumers spend approximately 60-70% of their decision-making time looking at packaging at the point of sale (POS). This underscores how pivotal visual design is in the final moments before purchase.


 The Bridge: Seamless Omnichannel Consistency

The modern consumer doesn’t distinguish between your online presence and your physical one. They expect a unified brand experience, and your packaging is central to delivering this. Omnichannel consistency ensures that the sleek, modern design seen on your website perfectly matches the product unwrapped at home or picked up from a store shelf. Discrepancies here can erode trust and dilute your brand identity packaging.

This consistency extends to communicating brand values. If your brand champions sustainability, then your sustainable packaging materials – such as compostable pouches, recycled content, or reduced plastic – should be evident both in your digital messaging and the physical feel of the product. This visual cue reinforces your brand’s ethos without needing explicit claims on the pack itself. Consumers increasingly look for brands that align with their values, and packaging is a direct expression of these commitments.

Furthermore, emerging technologies are blurring the lines between the physical and digital. Smart packaging, incorporating elements like QR codes, NFC tags, or even AR (Augmented Reality) triggers, allows a physical pack to provide a gateway to rich digital content. A QR code can lead to product information, recipe ideas, a brand story video, or even a virtual try-on experience, enriching the product journey and providing measurable data on engagement.


A Holistic Checklist for High-Impact Packaging

To truly achieve retail shelf impact and conquer the digital scroll, consider this comprehensive checklist for your packaging strategy:

Element

Stopping the Scroll (Digital Focus)

Stopping the Walk (Physical Focus)

Colour

High contrast, bold, legible in small formats. Instantly recognisable brand palette.

Emotionally resonant with product category. Differentiates from aisle competition.

Typography

Large, clean, legible sans-serifs for headlines. Prioritise clarity on small screens.

Clear visual hierarchy of information. Consistent brand fonts.

Shape & Form

Distinctive silhouette in product imagery. Fits digital advertising aspect ratios.

Ergonomic handling, stackability, and optimal fit for shelf-ready packaging (SRP).

Imagery

High-resolution, well-lit product shots. Clear depiction of product within packaging.

Lifestyle imagery (if applicable) that speaks to aspiration. Clear product visibility.

Material/Finish

Minimised glare for professional photography. Translates texture well in digital mock-ups.

Tactile branding (e.g., matte, gloss, soft-touch, embossing) that conveys quality.

Information

Concise, benefit-driven copy. Key information above the digital fold.

Crucial regulatory info, ingredients, and key selling points clearly visible. Inclusive design for legibility.

Sustainability

Clearly stated eco-credentials in product descriptions. Visual cues of sustainable materials.

Use of recycled, recyclable, or compostable materials visible and tactile.

Interactive

Links to augmented reality, 3D models, or digital experiences.

QR codes or NFC for extended content, brand stories, or customer support (smart packaging).

 You may also like:


Conclusion: Your Packaging, Your Most Valuable Asset

In the relentless pursuit of consumer attention, product packaging stands as a brand’s most enduring and versatile asset. It’s the silent advocate in a noisy market, the visual storyteller that transcends language barriers, and the tangible representation of your brand’s promise. Investing in intelligent, strategic packaging design isn’t an expense; it’s an investment in your brand’s visibility, desirability, and ultimately, its enduring success.

From the fleeting glance on a smartphone screen to the decisive grab in a bustling supermarket, packaging is the difference between being overlooked and being chosen. It’s about creating an undeniable magnetic force that compels action, whether that action is stopping a scroll or stopping a walk.

Is your packaging truly working hard enough for your brand? Is it optimised for every touchpoint? It’s time to audit your current approach and unlock the full potential of this critical marketing tool.

Pad Printing Explained - Blog Image

Pad Printing Explained: Why It’s the Go-To Method for Printing on Curved Surfaces

By Latest News No Comments

Printing on a flat sheet of paper is straightforward. Even printing on a flat piece of plastic or metal doesn’t present much of a challenge for modern machinery. However, the difficulty level rises significantly when you need to place a high-definition logo on the dimpled surface of a golf ball, the sloping side of a coffee mug, or the intricate, tiny buttons of a car dashboard.

This is where pad printing (technically known as tampography) becomes the hero of the manufacturing world. Often described as the “offset printing of the 3D world,” it is the most reliable and versatile solution for transferring 2D images onto complex, 3D substrates. For businesses looking for precision branding on irregular shapes, understanding this process is the first step toward achieving a professional finish.


What Exactly is Pad Printing?

At its heart, pad printing is a “soft” transfer process. Think of it like a high-tech rubber stamp, but with a lot more science involved. The process uses a flexible silicone pad to pick up an image from a flat cliché (a printing plate) and press it onto the product.


The Mechanics of the Move

The magic lies in how the ink moves from the plate to the pad, and finally to the product. It involves three main components:

  1. The Cliché (Printing Plate): Your artwork is etched or engraved into this plate. In modern high-volume setups, these are often made of hardened steel or laser-etched polymers to ensure the image remains crisp over thousands of impressions.

  2. The Ink Well or Closed Cup System: Most modern machines use a sealed ink cup. This cup acts like a reservoir, sliding back and forth over the cliché. It applies ink to the etched image and then uses a doctor blade (the ceramic ring on the cup) to scrape away the excess, leaving ink only in the etched area.

  3. The Silicone Pad: This is the “transfer vehicle.” Because silicone is flexible and has a low surface tension, it can “squish” into the etched plate to pick up the ink and then conform perfectly to the shape of the object it’s printing on.

Did you know?

The original pad printing “pads” weren’t made of silicone at all. In the 19th century, Swiss watchmakers used bags made of soft gelatin to transfer intricate numbers onto watch faces. It wasn’t until the mid-1960s that cold-vulcanised silicone was developed, which revolutionised the industry by making the process more durable and consistent.

Why It’s the “Go-To” Method for Curves

You might wonder why we don’t just use screen printing or digital UV printing for everything. The answer comes down to geometry.

1. Conforming to Irregular Shapes

Traditional screen printing requires a flat or perfectly cylindrical surface to work. If you try to screen print on a sphere or a concave surface, the screen can’t make proper contact. A silicone pad, however, can wrap around a curve, dip into a hollow, or press over a textured surface without distorting the image. This makes it the only viable choice for items like:

  • Convex surfaces (balls, helmets, curved electronics).
  • Concave surfaces (the inside of bowls or certain medical trays).
  • Textured materials (grained plastics or matte-finished metals).

2. Precision and Fine Detail

Because the ink film in pad printing is very thin, it allows for incredibly high precision registration. This is why you see pad printing on the tiny icons of a computer keyboard or the microscopic graduation lines on a medical syringe. The ink adhesion is also superior because the ink is formulated specifically for the substrate—whether it’s medical-grade plastic or industrial-strength metal.

3. Durability and Material Versatility

One of the biggest advantages for Australian businesses is the sheer range of materials pad printing can handle. Whether you are branding promotional pens or marking heavy-duty automotive parts, the process remains the same, though the ink chemistry changes.

  • Plastics: From ABS to Polypropylene, pad printing offers excellent bonding.
  • Metals: Stainless steel, aluminium, and coated metals are easily branded.
  • Glass and Ceramics: Often used for glassware where the print needs to survive a dishwasher.

To ensure the print doesn’t scratch off, manufacturers often use UV curing or heat tunnels to “set” the ink. For more difficult materials, primers or a process called “flame treatment” might be used to increase the surface energy of the product, ensuring the ink sticks for the long haul.

Did you know?

Pad printing is so precise and safe that it is even used in the pharmaceutical industry. Specially formulated edible inks are used to print logos and dosage information directly onto pills and capsules. The process is gentle enough that it doesn’t crack the delicate coating of the medication.


Pad Printing vs. Other Methods

To understand why pad printing is chosen so often, it helps to see how it stacks up against the competition.

Feature

Pad Printing

Screen Printing

Digital UV

Surface Shape

Irregular, Curved, 3D

Flat or Cylindrical

Mostly Flat

Detail Level

Extremely High

Moderate

High

Substrate Variety

Almost anything

Mostly flat plastics/fabrics

Specific coated surfaces

Speed

Fast (Up to 1,000+ per hour)

Fast (for flat items)

Slower (print head travel)

Setup Cost

Low to Moderate

Moderate

Low (no plates)

While digital printing is great for short runs with many colours, pad printing wins on speed and the ability to hit Pantone Color Matching (PMS) with 100% accuracy on dark or oddly shaped backgrounds.


Modern Trends: Sustainability and Technology

As we move through 2026, the industry is shifting toward “greener” practices. The days of heavy solvent-based inks are fading. Today, there is a massive push toward low-VOC (Volatile Organic Compound) inks and water-based alternatives that are better for the environment and the workers operating the machines.

Furthermore, automation is changing the game. Many pad printing setups now include Vision Inspection Systems. These use high-speed cameras to check every single print as it leaves the machine. If a logo is even 0.1mm out of alignment, the system flags it. This level of precision registration is why pad printing remains the standard for the medical and aerospace sectors.


Common Industrial Applications

If you look around your room right now, you are likely within arm’s reach of at least five pad-printed items.

  1. Automotive: The icons on your indicators, the labels on your gear stick, and the branding on your engine covers. These require high abrasion resistance to last the life of the car.

  2. Medical Devices: Catheters, syringes, and inhalers. These must use USP Class VI certified inks to ensure they are safe for human contact.

  3. Electronics: The “On/Off” button on your microwave, the branding on your smartphone charger, and the symbols on your remote control.

  4. Promotional Products: This is the most visible use—branded pens, fidget spinners, and drink bottles.


Did you know?

The longest-running pad printing machine might be found in the toy industry. For decades, iconic brands like LEGO have used pad printing to give their “Minifigures” their faces and outfits. Because the plastic (ABS) is notoriously difficult to print on, pad printing is the only way to ensure the faces don’t rub off after years of play.


Conclusion: Making a Lasting Impression

Pad printing isn’t just about putting a logo on a product; it’s about solving the problem of “how do we mark this?” when the object refuses to be flat. Its unique combination of flexibility, durability, and cost-effectiveness makes it an essential tool for any business that values high-quality branding.

From the tiny markings on a surgical tool to the bright logo on a corporate gift, pad printing provides a level of detail and versatility that other methods simply cannot match. If your product has a curve, a texture, or a complex 3D shape, pad printing is almost certainly the solution you need.

Modern Screen‑Printing Methods for Vivid Apparel

Modern Screen‑Printing Methods for Vivid Apparel

By Latest News No Comments

If you’ve ever pulled on a band t-shirt from a favourite gig, laced up in a local footy team’s jersey, or spotted a strikingly crisp graphic on a streetwear hoodie, you’ve encountered the workhorse of the apparel world: screen printing. But this isn’t your granddad’s method anymore. The craft has evolved dramatically, moving far beyond simple, plasticky transfers to become a sophisticated art form capable of breathtaking vibrancy and detail. For anyone in the market—be it a small business owner, an artist, or just someone with a keen interest—understanding the modern landscape of screen-printing is key to getting apparel that truly pops.

Let’s cut through the jargon and have a proper look at how these methods work, what’s new, and how to choose the right one for a knockout result.

How does screen printing operate and what is it?

At its heart, screen printing is a beautifully straightforward yet versatile process. It’s a stencil-based printing technique where ink is forced through a fine mesh screen onto a fabric surface. The areas not meant to be printed are blocked off on the screen, creating a precise negative stencil.

The process, also known as silk screening, breaks down into a few key steps:

  1. Design Creation:It all starts with a digital design, typically separated into individual colour layers. Each colour in the design will need its own separate screen.
  2. Screen Preparation:Each screen is coated with a light-sensitive emulsion and left to dry in a dark room.
  3. Burning the Screen: The emulsion-coated screen is placed on top of the split film positive, which is a black opaque representation of one colour layer, and exposed to intense light. The light hardens the emulsion everywhere except the areas covered by the design on the film. These unhardened areas are then washed out with water, leaving a clean, open mesh stencil of your design.
  4. The Print Setup:The prepared screen is mounted onto a printing press, and the garment is secured onto a pallet beneath it.
  5. Ink Application:Ink is placed on the top end of the screen. A squeegee is pulled across the screen with firm pressure, pushing the ink through the open mesh areas and onto the garment beneath.
  6. Curing:The printed garment is then passed through a conveyor dryer or flash-cured with a heat gun. This heat treatment permanently sets the ink into the fabric, making it wash-fast and durable.

This fundamental process hasn’t changed, but the technology, inks, and precision around it have advanced in spades, leading to a range of methods for different outcomes.

Screen Printing Image - Photo by emarts emarts on Unsplash
Screen Printing Image - Photo by Naomi August on Unsplash

What Kinds of Contemporary Screen-Printing Techniques Are There?

The old days of limited options are gone. Today, printers have a suite of techniques at their disposal, each with its own superpower.

Spot Colour Printing

This is the classic, most common form of screen printing. It uses solid, pre-mixed colours of ink (Pantone matching is a standard here). Each colour is applied by its own screen, one on top of the other, to build the final design.

Best for: Designs with a limited number of colours (think 1 to 4 for cost-effectiveness), bold graphics, text, and simple logos. It’s the workhorse for team uniforms, event shirts, and any design that prioritises bold, opaque colour coverage.

Simulated Process Printing

This is where things get clever. A small number of transparent, CMYK-like inks—Cyan, Magenta, Yellow, Black, plus white and maybe a highlight white—are used in the Sim Process technique to provide the appearance. By printing halftone dots of these colours on top of each other—much like a commercial printer does on paper—a skilled printer can mix colours directly on the garment to achieve a vast spectrum of shades and tones.

Best for: Highly detailed, photorealistic designs on dark garments. It’s the go-to method for printing complex artwork, lifelike portraits, and vibrant designs with colour gradients without the extreme cost of a full CMYK process.

CMYK Process Printing (Four-Colour Process)

This method uses only four transparent ink colours: Cyan, Magenta, Yellow, and Black. Unlike sim process, it doesn’t use a white underbase. This means it only works on white or very light-coloured garments, as the fabric itself provides the “white” background. Through subtractive colour mixing, all other colours are produced by overlaying the transparent inks.

Best for: Full-colour printing on white 100% cotton garments. It’s ideal for magazine-quality images, but is less common on apparel than sim process due to its limitation to light fabrics.

CMYK Print - Image by Steven from Pixabay

Discharge Printing

Discharge ink contains an ingredient that actually bleaches out (discharges) the garment’s original colour while replacing it, as opposed to applying an opaque coating of ink on top of it. The result is a print that feels like part of the shirt itself, with no heavy hand or crackly texture.

Best for: Soft-hand prints on 100% cotton dark garments. It’s perfect for brands wanting that premium, broken-in feel from day one. The print is breathable and integrates with the fabric, making it a premium choice.

Discharge Printing on Fabric by Melissa Dettloff.

Water-Based Printing

Similar to discharge, water-based inks soak into the fabric fibres rather than sitting on top of them. They are thinned with water and offer an incredibly soft hand feel and a matte, non-reflective finish. They allow for excellent breathability, as they don’t block the weave of the garment.

Best for: Detailed designs on light garments and a must for anyone seeking that “nothing there” feel. They can also be used on darks with a discharge agent. However, they can be trickier to work with, requiring more expertise to prevent the ink from drying in the screen.

Water based printing - sabioprinting.com
sabioprinting.com

High-Density Printing

This method uses special thick inks and modified screens to lay down a heavy deposit of ink that, when cured, rises up off the garment, creating a textured, almost 3D effect. It’s a method that gives a design a lot of tactile and visual weight.

Best for: Creating raised, textured logos and lettering. You’ll see it used for bold, impactful text on streetwear and high-fashion apparel where a tangible, premium effect is desired.

Faux High Density - screenprinting.com

Foil and Speciality Inks

The modern printer’s toolbox is filled with speciality inks that create unique effects. Foil printing uses an adhesive ink and heat-applied metallic foil to create a shiny, reflective surface. Other options include puff additives that expand when heated, creating a raised, textured print, glow-in-the-dark inks, and metallics.

Best for: Adding accent elements and highlights to a design. A bit of foil on a logo or some puff on lettering can make a design stand out from across the room.

Foil Screen Printing - familyindustries.com

What Are the Best Screen-Printing Methods for Every Specific Vivid Apparel?

Choosing the right method isn’t about what’s “best” in a vacuum; it’s about what’s best for your specific design, garment, and budget. Here’s a no-nonsense guide.

Bold Band Logo on Black Tees

  • Your Go-To:Spot Colour Printing with a white underbase.
  • Why: It’s the classic for a reason. You want those colours to be bright and opaque, punching through the black fabric. A white underbase ensures the colours on top stay true and vibrant. It’s cost-effective for a run of shirts and delivers a durable, long-lasting print that can survive countless mosh pits and washes.

Photorealistic Portrait or Complex Artwork on a Dark Hoodie

  • Your Go-To:Simulated Process Printing.
  • Why: This is the magic trick. Spot colour would require a dozen screens and look clunky. CMYK process can’t handle a dark garment. Sim process uses a clever combination of a white underbase and transparent inks in halftones to blend and create millions of colours directly on the garment. It’s the only way to achieve that level of detail and colour range on a black or navy garment. As the [Printing Industries Association of Australia] highlights in its technical resources, this method requires significant operator skill but delivers unparalleled results for complex imagery.

Ultra-Soft, Vintage-Style Print on a Coloured Cotton Tee

  • Your Go-To:Discharge Printing.
  • Why: Discharge is incomparable if the shirt’s feel is as crucial as its appearance. There is no discernible texture left once the print blends in with the garment. It’s breathable and feels like you’ve owned it for years straight out of the packaging. Just ensure your garment is 100% cotton, as discharge inks don’t work on poly-blends.

Simple, Breathable Design on a White or Light Shirt

  • Your Go-To:Water-Based Printing.
  • Why: For a design that needs to be subtle in feel but not in look, water-based is king. The ink soaks into the fibres, resulting in a completely matte finish that feels like the shirt itself. It’s perfect for large area prints where you don’t want any stiffness, making it a popular choice for fashion-focused brands.

Making a Logo or Text Pop Literally and Figuratively

  • Your Go-To:High-Density Printing.
  • Why: When you want people to feel your brand before they even read it, high-density delivers. That raised, rubbery texture adds a premium, tactile element that screams quality and attention to detail. Use it for a main logo element to really anchor your design.

Adding a Touch of Bling or a Special Effect

  • Your Go-To:Foil or Puff Additives.
  • Why: Never underestimate the power of a highlight. Using a spot colour method for the main design but adding a foil layer on a key element (like a word or emblem) creates incredible visual contrast and grabs light and attention. It’s a brilliant way to elevate a simpler design without breaking the bank on a full sim-process print.

The Bottom Line

The rigid, broken prints of the past are a far cry from the screen printing of today.  It’s a dynamic field where traditional techniques meet cutting-edge technology and chemistry. The collaboration between you and your printer is the secret to creating vibrant, long-lasting, and incredibly tactile clothing.

Come to them with your design, your chosen garment, and a clear idea of the feel you’re after. A good printer will then be able to guide you towards the most effective and efficient method to bring your idea to life. In today’s market, there’s no excuse for a mediocre print. With the right method chosen for the job, your apparel shouldn’t just be worn—it should make a statement.

Strengthening Brand Presence with Custom Packaging Designs

Strengthening Brand Presence with Custom Packaging Designs

By Latest News No Comments

In today’s competitive market, standing out isn’t just about having a great product—it’s about how you present it. Custom packaging designs play a crucial role in shaping brand perception, improving customer experience, and driving sales. Whether you’re a small Aussie business or an established brand, investing in tailored packaging can make a real difference.

This article dives deep into why custom packaging matters, how it strengthens brand presence, and practical ways to make it work for your business—without the fluff.


Why Custom Packaging Matters More Than Ever

1. First Impressions Count

Packaging is often the first physical interaction a customer has with your brand. In a 2018 survey, shows that 72% of consumers say packaging design influences their purchasing decisions. A well-designed package can instantly communicate quality, reliability, and brand values, making it a critical factor in converting browsers into buyers.

2. Enhances Brand Recognition

Consistent packaging builds familiarity—think of iconic Aussie brands like T2 Tea or Arnott’s Biscuits, whose packaging is instantly recognisable. Custom shapes, colours, and logos help your product stand out on crowded shelves. According to Nielsen, 64% of consumers try a new product simply because the packaging catches their eye, proving that standout design directly impacts sales.

3. Boosts Customer Experience

Unboxing has become a key part of the consumer experience, especially in eCommerce. Brands like Koala Mattress and Bellroy use custom packaging to create memorable unboxing moments that customers share on social media. A study by Dotcom Distribution found that 40% of consumers are more likely to make repeat purchases if the packaging feels premium, highlighting how thoughtful design fosters loyalty.

4. Supports Sustainability Efforts

More Aussie consumers prefer eco-friendly packaging, with 60% willing to pay extra for sustainable options, as reported by the McKinsey & Company. Custom packaging allows brands to use recycled materials, minimal inks, and biodegradable options, aligning with consumer values. Companies like Who Gives A Crap leverage 100% recycled packaging, reinforcing their brand ethos while meeting customer expectations.


Key Elements of Effective Custom Packaging

Strong Visual Identity

Colours, fonts, and imagery should align with your brand’s personality. Vegemite’s bold yellow and red packaging, for example, is unmistakable and reinforces its iconic status. High-quality printing techniques like foil stamping or embossing can elevate the perceived value, making your product feel more luxurious.

Custom Packaging Designs | Vegemite 100 Mitey years - Image by Delicious.com.au

Vegemite 100 Mitey years – Image by Delicious.com.au

Functional Design

Beyond aesthetics, packaging must protect the product while being user-friendly. Coles’ resealable snack packs demonstrate how functional design improves convenience, encouraging repeat purchases. Ergonomic shapes also enhance handling, particularly in retail environments where ease of access can influence buying decisions.

Custom Packaging Designs Image by Hercules Resealable Snack Bags | Coles

Custom Packaging Designs Image by Hercules Resealable Snack Bags | Coles

Personalisation & Engagement

Adding a handwritten note or custom message can deepen the connection with customers. QR codes are another smart addition, linking to promotions, loyalty programs, or behind-the-scenes content. Brands like Adore Beauty include small freebies in their packages, turning unboxing into a delightful experience that customers remember.

Custom Packaging Designs | Adore Beauty App

Image by Adore Beauty

Sustainability Features

Opting for FSC-certified or compostable materials not only appeals to eco-conscious shoppers but also future-proofs your brand. Research by IPSOS shows that, sustainability is an important factor for 78% of IPSOS Online Community members when they shop for any product, so clearly labelling eco-friendly aspects can sway buying decisions. Reducing excess packaging also cuts costs and waste, benefiting both your bottom line and the environment.

Research by IPSOS sustainability as an important factor

From IPSOS – ARE AMERICANS ACTUALLY SUPPORTING SUSTAINABILITY?

You may also like: What Is Greenwashing, and Why Does It Mislead Consumers?

How to Develop a Winning Custom Packaging Strategy

1. Know Your Audience

Understanding your target market is essential. Younger consumers often prefer bold, Instagram-worthy designs, while older demographics may prioritise functionality and simplicity. Bundaberg Rum, for instance, uses rugged, heritage-inspired packaging to appeal to its core market, proving that tailoring design to audience preferences drives engagement.

2. Work with Professional Designers

While DIY designs might save money upfront, they can come across as cheap. Investing in a skilled designer or agency ensures a polished result. Platforms like Canva offer affordable options for small businesses, but for high-end packaging, agencies like Hulsbosch—known for their work with Qantas—deliver exceptional quality that aligns with brand identity.

3. Test Before Full Production

Before committing to large-scale production, gather feedback from focus groups or sample customers. Check durability to ensure packaging survives shipping, and consider A/B testing different designs to see which resonates best. This step prevents costly mistakes and ensures your packaging meets both aesthetic and practical standards.

 4. Optimise for E-Commerce

With online shopping booming, packaging must be shipping-friendly—lightweight yet sturdy enough to protect contents. Adding branded tape or stickers boosts visibility during delivery, turning the package into a marketing tool. The Daily Edited, for example, uses sleek, branded mailers that enhance unboxing while reinforcing brand recognition.

5. Stay Consistent but Evolve

While consistency in core branding elements is key, periodic refreshes keep your packaging relevant. Coca-Cola’s seasonal campaigns demonstrate how to innovate without losing brand identity, ensuring customers stay engaged while maintaining familiarity.


Real-World Success Stories

Haigh’s Chocolates

Haigh’s elegant, heritage-style boxes reinforce their premium quality, while seasonal limited editions—like their Easter tins—drive repeat purchases and gift sales. Their packaging doesn’t just protect the product; it elevates the entire brand experience.

Milk and Dark Chocolate Squares Gift Box | Haigh’s Chocolates

Milk and Dark Chocolate Squares Gift Box | Haigh’s Chocolates

Aesop

Aesop’s minimalist, apothecary-style packaging aligns perfectly with their brand ethos. The use of brown glass bottles and simple labels conveys luxury and sustainability, appealing to discerning shoppers who value both aesthetics and ethics.

Aesop Gift Kits

Gift Kits – Image by Aesop

Bellroy

Bellroy’s clever, functional packaging—such as wallets that unfold into product displays—showcases their innovative approach. This not only enhances usability but also reinforces their customer-first philosophy, making the unboxing experience as thoughtful as the product itself.

Bellroy Packing Design

Bellroy Packing Design – Image by LovelyPackage.com


Common Mistakes to Avoid

Overcomplicating the Design

Too many colours, fonts, or graphics can make packaging look cluttered and unprofessional. A clean, cohesive aesthetic is far more effective in conveying brand identity and ensuring readability.

Ignoring Practicality

Fancy packaging that’s difficult to open frustrates customers. Some blister packs, for instance, are nearly impossible to open without scissors, creating a negative experience that can deter repeat purchases.

Cutting Corners on Quality

Thin, flimsy materials not only risk damaging the product but also cheapen brand perception. Investing in durable, high-quality stock ensures your packaging reflects the value of what’s inside.

Forgetting Brand Alignment

If your brand promotes sustainability, plastic-heavy packaging undermines that message. Lush’s use of reusable knot-wraps instead of traditional wrapping paper is a great example of packaging that stays true to brand values.

VMA Graphics & Print Logo

At VMA Graphic Design and Print, we specialise in creating custom packaging that transforms first impressions into lasting connections. From initial concept to the final print, we ensure your brand’s story is told beautifully and professionally.

DESING MY DREAM PACKAGING ➤

Final Thoughts

Custom packaging isn’t just a box—it’s a powerful branding tool. From boosting recognition to improving customer loyalty, the right design can set your business apart in a crowded market.

Key Takeaways:

  • First impressions matter—make yours count with packaging that reflects your brand’s quality.
  • Consistency builds recognition—stick to your visual identity while allowing for thoughtful updates.
  • Functionality is key—design with the customer’s ease and experience in mind.
  • Sustainability sells—eco-friendly packaging attracts conscious buyers and future-proofs your brand.

Whether you’re a startup or an established brand, refining your packaging strategy can lead to real growth. Ditch the generic boxes and start designing something that truly represents your brand.

What Is Greenwashing, and Why Does It Mislead Consumers?

By Latest News No Comments

Greenwashing—when companies trumpet their “environmentally friendly” or “eco friendly” credentials without meaningful action—has become a pervasive problem in today’s marketplace. From sugary cereals boasting “all‐natural” packaging to “gluten free” snacks that hide high levels of refined carbohydrates, misleading labels can lure well-intentioned shoppers into choices that don’t live up to their promises.

In this deep dive, we’ll explore the psychology fuelling greenwashing, why consumers fall for it, and how to spot the red flags. We’ll also share practical tips—like how to read the ingredient list and scrutinise nutrition facts—so you can make truly informed decisions.

What Is Greenwashing—and Why Does It Matter?

At its core, greenwashing is a marketing tactic. A company might emblazon a leafy logo, tout vague “environmental responsibility” initiatives, or slap an “eco friendly” badge on a food product—all while its manufacturing process remains unchanged.

Why should you care? Greenwashing can:

  • Mislead consumers into paying premiums for products that aren’t greener than standard alternatives.
  • Erode trust in genuinely sustainable brands.
  • Obscure the environmental impact of industries—making it harder to hold companies accountable.

The Halo Effect: Why a Green Label Feels “Better”

One key psychological trigger at play is the halo effect. When we see a label claiming “environmentally friendly,” our brains subconsciously assign other positive attributes—like healthfulness or purity—to the same product. As a result, we might assume that a bar labelled “gluten free” is also lower in added sugars, or that a soda with a green leaf icon contains more natural ingredients.

Schuldt JP. Does green mean healthy? Nutrition label color affects perceptions of healthfulness.
Schuldt, J. P. (2013). Does Green Mean Healthy? Nutrition Label Color Affects Perceptions of Healthfulness. Health Communication, 28(8), 814–821. https://doi.org/10.1080/10410236.2012.725270

Research shows these snap judgments are pervasive: for example, Jonathon P. Schuldt (2013) demonstrated that consumers rated a candy bar as significantly healthier when its calorie count was displayed in green versus red, even though the bars were nutritionally identical.

Likewise, packaging studies consistently find that green hues and “leaf” icons evoke notions of purity and low calories, leading us to gloss over ingredient lists or portion sizes in favor of the feel-good label.

Misleading Labels in Packaged Foods

Packaged foods are a hotbed of greenwashing tactics. Here are some terms to watch out for:

  • “All-Natural”: No regulated definition—manufacturers can use it on anything from potato chips to chicken nuggets.
  • “Gluten Free”: Essential for those with celiac disease, but often slapped on products that are otherwise nutrient-poor.
  • “Made with Real Fruit”: May sound wholesome, yet the product can still be loaded with added sugars or artificial colours.
  • “Non-GMO” and “Organic Lite”: While meaningful in some contexts, these claims can distract from high levels of saturated fat or sodium.

Before you get swayed, always check the list of ingredients and nutrition facts panel. The U.S. Food and Drug Administration’s guide to the Nutrition Facts Label helps decode vital info—like serving size, calories per serving, and daily value percentages.

Why Consumers Fall for Misleading Health Claims

Human brains are wired for shortcuts. When we shop in a busy grocery aisle, we rarely compare every single product feature. Instead, we rely on:

  1. Social Proof: If a friend raves about a “clean label” snack on social media, we’re more likely to try it.

  2. Authority Bias: A celebrity endorsement can make a product seem superior, even if the endorser has no nutritional expertise.

  3. Colour and Packaging: Shades of green, earth tones, and eco-themed imagery prime us to think “natural.”

  4. Scarcity: Limited-edition “organic” or “climate neutral” runs trigger a fear of missing out.

Marketers exploit these cognitive biases to mislead consumers. By understanding them, you can pause before that impulse purchase and ask: “Is this backed by real data?”

The Role of Nutritional Labelling and Food Labelling Laws

Regulations around food labelling vary by country, but most governments require a nutrition facts panel and an ingredient listed section. In the U.S., for instance, manufacturers must disclose:

  • Calories per serving size
  • Total fat, sodium, sugars (including added sugars), and more
  • A complete list of ingredients in descending order by weight

However, loopholes exist. Companies can highlight a single nutrient—like “0g trans fat”—while hiding high levels of sodium or sugar. They can frame the nutritional labelling to look cleaner, using typography and colours to steer your attention away from less-healthy numbers.

Social Media’s Influence on Eco-Claims

In the age of Instagram influencers and TikTok reviews, buzz around “climate conscious” snack bars or “responsibly sourced” beverages can spread like wildfire. In fact, over half of consumers (53%) say a brand’s transparency on social would cause them to consider it for their next purchase—and 37% say they’d buy more from a company that’s transparent on social.

Yet, while consumers increasingly reward brands for social media transparency, many eco-friendly claims shared online lack the evidence to justify that trust.

Always ask yourself:

  • Did they cite a peer-reviewed study or government report?
  • Is there any data on actual resource use or waste reduction?

Environmental Responsibility vs. Marketing Spin

True environmental responsibility involves comprehensive actions—like reducing greenhouse gas emissions, minimising water use, and ensuring fair labour practices throughout the supply chain. But marketing departments know these details won’t fit on a front-of-package label.

Beware of terms such as:

  • “Carbon neutral”: Does it involve real emission reductions, or just the purchase of offsets?
  • “Biodegradable”: Under what conditions? Industrial composting? Backyard compost?
  • “Sustainably sourced”: Which ingredients, and based on what certification?

For reliable guidance, check third‐party certifications—such as Fair Trade, Rainforest Alliance, or USDA Organic—and look up their standards. A true eco-certification body will publish criteria online, instead of relying only on a trademarked logo.

Case Study: The Pitfalls of “Gluten Free” Marketing

The “gluten free” trend began as a lifesaver for those with celiac disease or gluten intolerance. However, it’s become a catchall label that implies healthfulness. Many “gluten free” packaged foods compensate for missing wheat proteins by adding refined starches and sugars, inflating calorie counts without offering meaningful nutrition.

A recent cross-market comparison by Bathrellou & Kontogianni (2024) examined 351 cereal-based gluten-free products and 562 gluten-containing equivalents in Greece and found that, although overall nutrient profiles were largely comparable, roughly 25 % of gluten-free items still showed an “unhealthy” profile—high in fat, sugar, or sodium—even when a “gluten free” badge was front-and-center.

Bathrellou, E., & Kontogianni, M. D. (2024). Nutritional value of cereal-based gluten-free products and comparison to that of gluten containing counterparts in the Greek market.
Bathrellou, E., & Kontogianni, M. D. (2024). Nutritional value of cereal-based gluten-free products and comparison to that of gluten containing counterparts in the Greek market. International Journal of Food Sciences and Nutrition, 75(7), 664–672. https://doi.org/10.1080/09637486.2024.2397057

By zeroing in on the “gluten-free” claim and ignoring the nutrition facts, consumers can unwittingly select products that contribute to blood-sugar spikes and excess sodium intake.

How to Spot and Avoid Greenwashing

  1. Read Beyond the Front Label
    Don’t stop at buzzwords. Flip the package and examine the list of ingredients and the serving size. A “100 calories per bar” claim may be per half-bar serving—so you’re actually eating 200 calories.

  2. Check for Third-Party Verification
    Genuine environmental responsibility claims will be backed by transparent standards. Look for recognised logos (e.g., USDA Organic, Fair Trade) and visit certifier websites to review their criteria.

  3. Scrutinise Health Claims
    Claims like “heart healthy” or “supports immunity” may not require FDA approval. Verify them against trustworthy sources.

  4. Follow the Money
    Research whether the brand’s parent company has a documented environmental record. A single sustainable line within a larger, less-green conglomerate might be nothing more than a PR stunt.

  5. Use In-Depth Apps and Databases
    Apps like Fooducate let you scan barcodes to reveal hidden additives, levels of added sugars, and questionable chemicals—helping you look past superficial food labelling.

Practical Tips for Healthier, More Sustainable Choices

  • Compare Similar Products: Line up two cereals side by side and check both the nutritional labelling and the list of ingredients. Which one has less sugar and fewer preservatives?
  • Buy Whole Foods When Possible: Fresh produce, beans, and unprocessed meats rarely require marketing claims to prove their purity.
  • Cook at Home: When you control the serving size, ingredients, and cooking methods, greenwashing can’t touch you.
  • Support Transparent Brands: Look for companies that publish annual sustainability reports, with clear metrics on energy use, waste reduction, and labour practices.
  • Share Your Findings: Use social media to spotlight brands with genuine environmental responsibility, and call out those that fall short.

Looking Ahead: The Role of Regulation and Consumer Advocacy

As greenwashing grows more sophisticated, governments and watchdogs are stepping in:

  • The U.S. Federal Trade Commission’s Green Guides offer guidance on environmental marketing claims.
  • Under its Circular Economy Action Plan, the EU has put forward a Directive on Green Claims to harmonize and enforce environmental labeling and launched the Ecodesign for Sustainable Products Regulation to set mandatory durability, reparability and recyclability criteria—effectively tightening eco-labeling standards across the single market. Circular Economy Action Plan.
  • Grassroots movements—like the #LabelGoodLife campaign—pressure brands to move from buzzwords to meaningful action.

Ultimately, the best defence against greenwashing is an informed, empowered consumer. By combining critical thinking with a healthy dose of skepticism, you can ensure that the food labelling and health claims you trust truly reflect a product’s merit.

Conclusion

Greenwashing preys on our desire to do good—to protect the planet, to eat healthily, and to feel socially responsible. But sly marketing can twist these noble aims into mere sales tactics. By understanding the psychological traps—like the halo effect and authority bias—and by learning to read the nutrition facts, serving size, and ingredient listed panels, you reclaim control over your choices. Remember: an “eco friendly” logo doesn’t guarantee integrity, and “gluten free” doesn’t equal healthy.

Next time you reach for a packaged snack or an eco-branded beverage, slow down, click through to reputable sources, and demand real transparency. Your body, your wallet, and the planet will thank you.

Sharing is caring!

The post ( What Is Greenwashing, and Why Does It Mislead Consumers?) appeared first on Visual Marketing Australia.
Source: Source link

Building a Freelance Graphic Design Portfolio

Building a Freelance Graphic Design Portfolio: Tips and Tricks for Success

By Latest News No Comments

Your toolbox in freelance graphic designing is a portfolio-the greatest tool-it’s all that. A visual resume for yourself, your storyteller, and first impression altogether. Whether old or brand new into the designing game, a really great portfolio may make all the difference in attracting or simply turning down clients you have dreamt about. This guide provides you with actionable steps for developing an effective free-lance portfolio in graphic design that will advertise not just your skills, but also your personality and professionalism.


1. Quality Over Quantity

The unfortunate mistake most designers make is filling their portfolios with the every project they have ever completed. It should be a selection of your finest works. Clients or agencies tend to want to see what you are capable of doing at your highest level, and certainly not a laundry list of mediocre projects.

Be ruthless in editing: Only include work that accurately reflects what you are currently able to do and what kinds of projects you want to pursue. If you are looking for logo design jobs, make sure that logos take precedence over things like text for social media templates that are unrelated.

Show progressive levels of growth: If designing fresh as a professional, include personal projects or completely redefined past works to demonstrate real growth.

Prioritise Diversity: Even in your niche, display a variety of styles, mediums, and industries to show your versatility.


2. Case Studies Tell a Story

Static images of your designs just don’t cut it. Clients want to know what your process is and how you solve problems. Case studies take your portfolio from gallery to narrative-driven showcase.

Define the problem: Start with an explanation of the client’s challenge or goal (“A local bakery needed a rebranding to appeal to a younger audience”).

Walk through your process: Include sketches, mood boards, and iterations to show the thought process behind your creativity.

End with results: Whenever possible, include metrics (e.g., “The new packaging design increased sales by 30%”) or client testimonials. For instance, if one designs a website for a nonprofit, explain how aesthetics and usability are balanced to improve donor engagement.


3. Emphasise Your Niche (But Be Flexible)

Focusing on a single niche, such as packaging design, motion graphics, or branding, can give you a unique face in an oversaturated market. But do not box yourself into that niche if you are still finding your footing.

Know your strengths: So, typography? Illustrative logo design? UI-UX? Emphasise that uniqueness.

Juggling niche work with other projects: Create a great variety of projects, so that even if you stick to a niche, you maintain a sense of versatility.

Portfolio personalisation for specific audiences: Choose projects that accentuate your portfolio toward the specific kinds of clients you’re attempting to obtain. App design and a modern aesthetic for a tech startup; luxury branding for one serving boutique clients.


4. Optimise User Experience

The design of your portfolio should showcase your prowess as a designer. An untidy or confusing design erodes credence.

Glossy yet simple: Let your work shine. Avoid unnecessarily complicated animation or distracting backgrounds.

Mobile-friendly design: More than 50% of web traffic comes from mobile devices; therefore, your portfolio must be rendered beautifully across all screen sizes.

Fast Loading Speed: Compress all images and avoid using heavyweight files. Platforms like Adobe Portfolio, Squarespace, or Webflow have optimised templates for you.

Clear navigation: Include categories such as `Branding`, `Web Design`, `Print`, and stick a `Contact` button where it’s easy to see.


5. Show Some Personality in Your Portfolio

Clients hire more than skills; they hire real people. Therefore, your portfolio must stand for your distinct style and voice.

Here is a better ‘About Me’ section: Talk about your background, design philosophy, and hobbies. A nice picture humanises your brand.

Cohesive branding: Develop your logo, colour scheme, and typography that all communicate your personal brand. Add a blog or journal: Share design tips, project breakdowns, or industry thoughts to position yourself as an expert.


6. Make Use of Testimonials and Social Proof

Trust is built through third-party validation. Ask your friends, professors, and clients for a few testimonials as soon as you begin freelancing.

Place client words: Place content testimonials at various undertaking sites (e.g, a quote about your logo work with the branding case study assigned).

Display past logos of clients: Make a section titled, “Clients,” if you have had experience with very recognisable brands.

Put in Certificates and Accolades: Mention all of those certifications you have obtained in design competitions, courses taken, and software proficiencies, for instance, become an Adobe Certified Expert.


7. Bring in Quality Images

All the great designs in the world can be undone by pixelated images or poorly photographed print work.

Invest in professional photography: For things like packages or posters that are going to be professionally displayed, hire a photographer or teach yourself the basics of product photography.

Contextualise: Display your designs in the setting in which they are generally used, like a logo on a business card or a website on a laptop screen.

Include video or GIFs: Streams are great, but with things such as motion graphics or interaction design, a very short clip can possibly demonstrate the functionality involved.


8. Keep Updating Your Portfolio at All Times

A portfolio that has outlived its usefulness suggests stagnation. It is a document that keeps evolving as your career progresses.

Add new projects to your portfolio at least once a quarter: Each quarter, remove the work that is now stale.

And Revamp Your Branding: Make sure your portfolio’s design is updated every 1–2 years to keep pace with current trends. Track analytics: Use tools like Google Analytics to see which projects get the most clicks and adjust accordingly.


9. Promote Your Portfolio Strategically

Even the best portfolio won’t get clients if nobody sees it.

Search engine optimisation: Put a few search words like “freelance graphic designer” or “branding specialist” in the metadata of the site.

Social media: Share the project on platforms such as Instagram, LinkedIn, or Dribbble. Use a few hashtags (#GraphicDesign, #LogoDesign) to go with it.

Network offline: Whenever going to meetings, conferences, or local business events, bring samples either on a tablet or printed.


10. Common Portfolio Mistakes to Avoid

Not considering what the client wants: Your portfolio should attract your targeted audience. Corporate clients may not give two cents for your art-a-thon.

Too word-heavy: Keep it short. Visuals should speak first.

There is no call-to-action: End with CTAs like “Let’s Work Together” or “Get in Touch.”


Final Thoughts

Developing a freelance graphic design portfolio is a dynamic process. More than just showcasing work, it’s building a story that connects with and captivates your ideal clients. By emphasising quality, storytelling, and user experience, you will arrive at a portfolio that showcases talent, garners trust, and opens new doors to opportunities. Keep in mind that your portfolio represents who you are. Keep it true to yourself, keep it fresh, and most importantly, let your love for design shine through. Now go create something great!

Why Mobile Optimisation Improves Your Google Search Presence – Visual Marketing

By Latest News No Comments

In the contemporary digital world, having a stiff online presence is no longer an option but a necessity. Mobile optimisation is the critical factor beside other things that influence search engine rankings.

Google acknowledges that more than 60% of global web traffic comes from mobile devices, which are continually improving and ranking websites.

If your website is not mobile-optimised, ranks will probably be hard to come by. So, why does mobile optimisation accrue such importance, and what benefits does a Google search presence accrue from mobile optimisation? Let’s find out.


Mobile First Era

Moving to mobile-first indexing means that Google now gives priority to the mobile version of your website to rank and index your pages. In other words, if your site is not mobile-optimised, then Google finds it hard to understand and rank it. This change mirrors the present user behaviours — most people are busy searching, browsing, and shopping on their smartphones. Hence, a mobile-optimised layout ensures an incredible user experience, and that is nurtured and rewarded by Google with a higher rank.


A classic example for clarity- a user types in ‘best running shoes’ from a mobile phone. A mobile-optimised website may appear in a disarray, with text too small to read or buttons so close that it is impossible to click them. Users feel frustrated and are highly likely to jump off your website and go to your competitor. Google will see this action as signs that your website is providing a low quality user experience and will punish you with a lower rank. A mobile-friendly site that is easy to navigate and fast in loading will, on the contrary, keep users on your site and instruct Google that it deserves an excellent ranking due to value.

Related reads:

Enhanced Experience of Users Must Translate into Better Ranks

Improving the users’ experience from the mobile optimisation is not for Google alone. It is for the users themselves. Mobile responsive websites that load fast engage users and reduce bounce rates. When users spend more time on your site interacting with good content, Google takes this as a positive signal that will improve your ranking on search engines. However, a poorly optimised mobile site is frustrating to users, increases bounce rates, and ranks low.


A sample is when you are crafting an e-commerce store selling handmade jewellery. If the mobile site is clunky, images take ages to load, and checkout requires hours of scrolling, chances are rue that your site would be abandoned at the cart checkout. Just the opposite, a fully optimised mobile site with clear, attractive pages that load quickly and a streamlined checkout would compel people to complete the sale. Good for conversion rates but, more importantly, sends a message to Google that you offer a user-friendly experience and, in turn, helps you climb those search rankings.


Faster Load Times Count

It’s a vital aspect not only for users but also for SEO. Websites loading in less than three seconds are what’s expected by mobile users; if it exceeds that, it is likely they will ditch the site. Google’s algorithms favour fast-loading websites for ranking, especially when it comes to mobiles. Optimisation of this site for mobile increases user satisfaction and gets in line with Google’s performance metric.


Take for instance a news website covering breaking stories. If it takes five seconds to load on mobile, a reader will lose interest and switch to a site that loads instantly. It will not only drive traffic away but would also affect ad revenue and search rankings with it. On the contrary, a news site optimised for mobile, good loading time, and responsive design will keep many readers glued and make them return for future updates. This positive user behaviour is recognised and rewarded by Google with better visibility for the site in the search results.


Local SEO Benefits

Mobile optimisation matters, especially for local businesses. Most mobile searches are location-sensitive; for instance, “coffee shop near me” or “plumber in [city].” If your site is mobile-friendly, your business will show up in these local search results, thereby increasing foot traffic and conversions. Google My Business and other local SEO tactics will ensure that mobile optimisation maximises your visibility.


As in the case of a small bakery in London, it’s more likely to be found in the search results when someone nearby searches for “fresh croissants near me” if it has a mobile-optimised website. A mobile-friendly site that includes contact information, a clickable phone number, and easy map navigation would also allow customers to find the bakery quickly. Further, merging Google My Business with correct hours of operation, photographs, and reviews will strengthen local SEO benefits so that the bakery stands out in that local search result.


Real-World Examples of Mobile Optimisation Success

Amazon: An e-commerce behemoth, perhaps the most stellar example to illustrate mobile optimisation in action. They have developed their mobile site and app for speed and ease of use, encompassing features such as one-click purchasing and personalised recommendation. This seamless customer experience, one of the core aspects of engagement, has ensured that Amazon remains at the top of the competitive search market for innumerable product-related queries.

Starbucks: Starbucks’ mobile site and application are superbly optimised to let users easily find nearby locations, menu browsing, and placing orders. They are good with local SEO and ensure their friendly design appears for responses to keywords like “coffee near me,” allowing them to generate online stores and in-store traffic.

The Guardian: This media organisation has invested heavily in mobile optimisation to keep their site fast and beautiful on every screen. This, therefore, directly translates to more engagement and higher ranking in trending news topics, even in a competitive search environment.


Ways for Optimising a Responsive Website

There are some terrific tips in this article for making your website highly responsive and really fast with user-friendly features to assure you get the best of mobile optimisation:

Reduce Unwanted JavaScript

Heavy JavaScript codes may very much bring your website down, especially when opened by low-power mobile devices. Take all those codes, streamline them, and get rid of all unneeded scripts.

Test Your Website Using Google Tools

One can utilise tools like Google PageSpeed Insights and Lighthouse to learn what can be improved. These tools will provide actionable insights which can further be taken into consideration to optimise load times and doing better.

Use Up-to-date Image Formats

Replace obsolete image formats such as JPEG and PNG with their more recent versions-WebP or AVIF. These new formats offer excellent quality with high compression ratios, meaning low loading times without degrading the visuals.

Make Your Site Web Accessible

Accessible (a11y) best practices should be implemented so that anyone can use your site, even people with disabilities. This includes the use of good alt text for images, a keyboard-friendly navigation interface and having high contrast colours.

a11y is a numeronym (a number-based abbreviation) for the word “accessibility.”

  • a = first letter of “accessibility”
  • 11 = the number of letters between “a” and “y” in “accessibility”
  • y = last letter of “accessibility”

It’s commonly used in tech and web development communities as shorthand for discussing digital accessibility—the practice of making websites, apps, and tools usable for everyone, including people with disabilities (e.g., visual, auditory, motor, or cognitive impairments).

Keep Up with Responsive Design Trends

The landscape of technology constantly shifts with the progress of time; mobile devices have no different tendency to newer technologies. New updates-like designing layouts for foldable screens-hence would include ensuring every new mobile device can interact with your website.


Conclusion

With proper mobile optimisation today being the criterion for bettering your Google search presence, much consideration has to be given in developing a super-responsive, ultra-fast, and easy-to-use website. By doing this, you’re following Google requirements, and in actuality, you’re doing your audience a favour. Smaller players, or big enterprises—whichever the case, investing in mobile optimisation will ensure a bumper rank payoff, increased visitor appeal, and ahead-of-the-competition status.

So, start with an audit of your website, put these tips into practice, and watch your Google search presence rise with flying colours. Because in this crazy world of SEO, mobile optimisation is what gives you access to your glory.

Sharing is caring!

The post ( Why Mobile Optimisation Improves Your Google Search Presence – Visual Marketing) appeared first on Visual Marketing Australia.
Source: Source link

What is the Maximalist Graphic Design Trend All About

What is the Maximalist Graphic Design Trend All About?

By Latest News No Comments

Scrolling through Instagram or on an audacious fashion label website, while maybe waiting for the bus and staring at contrasting vibrant posters, would have introduced you to maximalist graphic design. It is under the banner “more is more,” an act of rebellion against the minimalist crisp aesthetics that prevailed in the 2010s. But what is maximalism all about, and why has it begun resonating strongly? Let’s get down to the nitty-gritty.


Maximalism 101: A Visual Watershed

Maximalist design assumes that you can just throw every colour, pattern, and font on a page. This is, however, an intentional, much-planned celebration of excess. Think “visual storytelling” dialled up to eleven. Some key traits include:

1. Bold Colour Palettes: Clashing with Confidence

Maximalism discards muted tones in favour of loud, bright colour combinations that exude energy and emotion. Neon gradients with terracotta hues, or acidic yellows with deep purples: any combination that makes for great visuals that feel as loud as they look!

Gucci's 'Cosmogonie' Cruise 2023 campaign

Gucci’s ‘Cosmogonie’ Cruise 2023 campaign

Gucci’s ‘Cosmogonie’ Cruise 2023 campaign features striking visuals that exemplify bold color palettes and clashing prints. The campaign showcases vibrant combinations, such as fiery reds paired with icy blues, creating a surreal and dreamlike atmosphere.

The campaign images are inspired by classic paintings and incorporate elements of astronomy and the cosmos. They feature models adorned in headbands with embellishments, faux fur outerwear, and dresses with sheer overlays, set against backdrops reminiscent of Baroque-era portraits.

2. Maximalism Design Elements

Layering isn’t chaotic—that is just built outwards from a single idea. Layering ideas juxtaposing photographs on each other has so much potential for depth, movement, surprise, and confusion. Textures apply interest, such as grunge or glitter. In maximalism, textures, photos, and illustrations, as well as 3D elements, come crashing together to narrate a story.

Adobe MAX 2022

Adobe MAX 2022 – fromsmash.com

Conference branding for Adobe MAX in 2022 incorporated the concept of glitches, floaty forms, overlapped gradients, and funny typography to represent the creative chaos of design. It all felt active but also cohesive. 

3. Mix and match: Fonts in dialogue

Maximalism embraces typography, contrasting things. Serif and graffiti-style script fight in one corner one second, while chunky headlines and delicate handwritings do the dance together in the next. You have to play too: Every type must do its job: as in titling, subheading, or decoration.

Kiss Kiss Bang Bang Maximalist Typography Poster

Kiss Kiss Bang Bang Maximalist Typography Poster – Elena Suster

This poster features bold, contrasting typography styles layered together to create a dynamic and eye-catching design.

4. Nostalgia and Eclecticism: Aesthetic Time Travel

Maximalism raids design history, mixing retro motifs with ones from the digital age. Think Memphis squiggles with glitch art, or ’70s psychedelia reimagined by a 3D render.

Stranger Things - Worlds Turned Upside Down | Kyle Lambert

Stranger Things – Worlds Turned Upside Down | Kyle Lambert

Example: Stranger Things’ posters mix 1980s neon signage, VHS tape distortion, and CGI monsters-a maxed-out salute to the series’ time-warping plot.


Where Did The Maximalism Originate?

Maximalism finds its roots far beyond the grids of Instagram and neon lights of billboards. From there, in order to understand this resurgence, we need to unpack its historical DNA, its clash with minimalism, and culture-wide shifts that facilitate its comeback. So let’s break it down.

1. Historical Foundations: Baroque, Victorian, and Beyond

Maximalism’s love of excess has ancestors in art and design history:

Baroque (seventeenth and eighteenth centuries) acquires a special place in the genealogy of maximalism, being so much about drama, opulence, and pure emotion. Picture gold-leaf ceilings, swarms of putti, and super-dramatic-giants-like Caravaggio. Since it was designed to overwhelm the senses, this reminds me of modern maximalism throughout its efforts to enthral and fully capture an audience.

The Victorian Era (ninth century): Victorian interiors were a zigzag of patterns—floral wallpapers, velvet drapes, cluttered curio cabinets—horror vacui—”fear of empty space”—while these collide with maximalist collages and layered imagery of today. 

2. The Minimalist Backlash: How Maximalism Rose Again

The maximalists renaissance today is a direct result of the intolerable amounts of minimalism trends seen throughout the 2010s. Companies like Apple, MUJI, and IKEA took the clean lines, neutral palettes, and “less is more” just for fantasticiously global aesthetic standards. But in time, this simplicity has started to feel sterile, if not impersonal.

The Algorithm Trap: Social media technology decided to churn out more minimal, very legible content (think white backgrounds and sans-serif fonts) to feed filters. Maximalism can forward a protest against this hegemony, offering some visuals with an apparent touch of humanity competing against the ready-made, each One Identical noteworthy. 

3. Cultural Catalysts: Maximalism Appeals Right Now

The three shifts in society that account for the great comeback of maximalism are:

a) Digital Overload: Competing with Attention

Around ~6,000 ads attack the individual each day. In order to stand out among maximum-minimum noises, designers start talking with maximum stimulation:

What Is Liquid Death? The Canned Water Trend, Explained - Maximalist

What Is Liquid Death? The Canned Water Trend, Explained By Amanda Bretz

Example: Liquid Death’s identity: this uses heavy metal-inspired typography, absurd humour, and over-the-top packaging to cut through the commodification of canned water.

b) Self-Expression: This is the Age of “More Is You”

Maximalism becomes an extension of the identity itself for Gen Z and millennial kids who grew up learning personal branding in small niche subcultures.

Harry Styles combines psychedelic rainbows, fringe from the 1970s, and punk patches on merchandise from “Love On Tour,” which serves as a walking collage of his eclectic personality.

c) Sustainability Fatigue: Escaping the “Eco-Austerity”

While eco-consciousness remains vital, the rise of “sad beige” sustainability (think recycled packaging in muted tones) left audiences craving joy. Maximalism answers with guilty-free indulgence.

Example: Gucci’s Off The Grid Collection uses recycled materials but pairs them with bold logos, neon accents, and maximalist campaigns. Proves that eco-friendly doesn’t mean bland. 

4. Maximum Fashion’s Modern Hybrids:

Today’s designer does not copy but remixes past artistic styles:

Baroque 2.0: Fashion house Dolce & Gabbana offers Baroque florals and constrains them within streetwear, thus coming up with gold-embroidered hoodies and mosaic-patterned sneakers.

Victorian Glitch: This is where Artist Hugo Passarello Luna fuses Victorian-style portraits with digital distortion: Opposing tensions of old versus new.


Where Maximalism Will Be Seen

  • Branding and packaging: Maximalism attracts attention to brands that need it, for instance, Gucci, Balenciaga, or Marmite. Cluttered but purposeful packaging designs sit on crowded shelves yelling, “Look at me!”
  • Album arts and posters: Billie Eilish and Lil Nas X make use of disorderly visuals that match their daring sounds.
  • Digital space: Websites and layouts use animated layers and GIF-like transitions and pack all the animation in so that the user cannot get bored.
  • Editorial design: Magazines like Bored Panda or Kinfolk (in its bolder issues) mash photographs, illustrations, and text in a demented layout.


How Maximalism Works (If Done Properly)

Maximalism is not an all-out frenzy; rather, it is an act of precision in balancing excess with intention. The road that separates captivating maximalist design from annoying clutter runs through three principles: hierarchy, repetition, and negative space. Here, that trio of tools will be analysed on how they create astonishing visuals that do not overwhelm.

1. Hierarchy: The Anchor in the Storm

Even in the busiest layouts, a clear focal point acts as a North Star for the viewer. Without hierarchy, maximalism becomes visual noise.

How it works:

  • Contrast is key: Scale, colour, or typography will ensure that one element stands out above another contributing factor. The design could hinge on the weight of a huge, neon headline or a centralised photo collage.
  • Second, Z is the ruling order: eyes approach design in the “Z” configuration. Hence, lay the hero element on the top-left (say, a bold title) to then have details that sequence into the flow.
  • Example: Wes Anderson’s movie posters: The posters are busy, but the title has the largest proportion, often centred or at the top. The supporting visuals (quirky illustrations, tiny characters) orbit around it.  

2. Repetition: The Chaos of Rhythm

Repetition creates a bond among the elements in the design and gives order to uncharted chaos in design. It is the glue that allows maximalism to feel like a composition rather than randomness.

How it works:

  • Colour echoes: Repeat two or three accent colours in typography, shape, or texture.
  • Pattern loops: Have one repeated motif (e.g. polka dots, squiggles) to establish visual cadence.
  • Typography consistency: Mix and match those fonts, but use one type family repeatedly for headers or quotations. That offers a sense of familiarity.

Example: The New Yorker magazine illustrations: Many artists such as Christoph Niemann repeat geometric shapes (circles, stripes) against the field of clutter, directing the viewer’s gaze. 

3. Negative Space: The Secret Breathing Room

Maximalism is not afraid of empty space, but rather makes use of it in those special areas. Every little pocket of breathing room prevents becoming overwhelmed by elements and draw attention to important ones.

How it works:

  • Micro-negative space: Keep available slim empty zones around blocks of text (i.e. margin spaces) or single elements (like a logo) in an expanse of clear space.
  • Transparency illusions: Employ translucent layers or gradients on busy backgrounds.
  • Example: Gucci’s website: Even with graceful product grids and flourishing animations in between them, no sections are spared a clean white frame, thwarting visual fatigue.


How to Embrace Maximalism (Without Chaos)

Want to experiment? Start here:

  1. Pick a Theme: Retro futurism? Cyberpunk? Let a concept guide your mix of elements.

  2. Limit Your Palette (Just a Bit): Choose 3-4 dominant colours to avoid overwhelming viewers.

  3. Play with Scale: Juxtapose tiny details with oversized typography.

  4. Tell a Story: Every layer should contribute to the narrative—whether it’s rebellion, joy, or nostalgia.


Conclusion

Maximalist graphic design is a rebellion against restraint, a visual middle finger to “less is more.” It’s messy, loud, and unapologetically human—perfect for a world craving authenticity and excitement. So next time you design, ask: Could this use more glitter? The answer might just be “YES.” (And if anyone calls it “cluttered,” just say it’s “curated chaos.”) 🎨✨

How to Master Typography in Graphic Design: A Comprehensive Guide

How to Master Typography in Graphic Design: A Comprehensive Guide

By Latest News No Comments

Typography is one of those things that’s everywhere, but most people don’t really notice it—until it’s done badly. Think about it: when you see a sign with cramped, hard-to-read text or a website with fonts that just don’t match the vibe, it’s jarring. But when typography is done right, it’s like magic. It pulls you in, guides your eyes, and makes everything feel intentional and polished.

So, how do you get good at typography? It’s not just about picking pretty fonts. It’s about understanding the rules, the tools, and the little details that make typography work. Let’s break it down.

What is Typography?

Typography is the art of arranging type to make written language legible, readable, and visually appealing. It’s not just about the letters themselves, but how they interact with each other, the space around them, and the overall design.

Think of typography as the voice of your design. The font you choose, the way you space it, and how you organise it on the page all contribute to how your message is received. A bold, chunky font screams confidence, while a delicate script whispers elegance. Typography sets the tone before anyone even reads a word.

Common Types of Fonts

Before we dive into choosing fonts, let’s get familiar with the main categories. Fonts are like personalities—they each have their own vibe. Here are the big ones:

Serif Fonts

These are the classics. They have little “feet” or strokes at the ends of their letters (think Times New Roman). Serif fonts are timeless, professional, and great for print. They’re like the tailored suit of typography.

Serif - Typography in Graphic Design

Sans-Serif Fonts

No feet here. These fonts are clean, modern, and straightforward (think Helvetica or Arial). They’re perfect for digital designs and anything that needs to feel sleek and approachable.

Sans-Serif - Typography in Graphic Design

Script Fonts

These mimic handwriting and range from elegant calligraphy to casual cursive. They’re great for adding a personal touch but can be tricky to use without looking over-the-top.

Script - Typography in Graphic Design

Display Fonts

These are the wild cards. They’re bold, quirky, and often designed for specific purposes like headlines or logos. Think of them as the statement piece of your design—use them sparingly.

Display Font - Typography in Graphic Design

Monospaced Fonts

Every letter takes up the same amount of space, like old typewriter text (Courier, for example). They’re not super versatile but can add a cool retro or techy vibe.

Monospaced Font - Typography in Graphic Design

Choosing a Font

Picking the right font is like casting the right actor for a role. It has to fit the part. Here’s how to nail it:

Fonts to Avoid

Not all fonts are created equal. Some are overused, some are just plain bad, and others are situational. Here’s a quick list of fonts to steer clear of (unless you have a really good reason):

  • Comic Sans: It’s the poster child for “unprofessional.” Unless you’re designing a kid’s birthday party invite, just don’t.
  • Papyrus: It’s not 2003, and you’re not designing a poster for a local yoga retreat. There are better options.
  • Curly or overly decorative fonts: These can be hard to read and often look dated.

Fonts to avoid - Typography in Graphic Design

The key is to avoid fonts that distract from your message. If someone has to squint to read it or if it feels out of place, it’s probably not the right choice.

Combining Fonts

Using more than one font in a design can add depth and interest, but it’s easy to overdo it. Here’s how to combine fonts like a pro:

  1. Stick to 2-3 fonts max: Any more than that, and your design can feel chaotic.
  2. Pair contrasting fonts: Combine a serif with a sans-serif, or a bold display font with something simple. The contrast creates balance.
  3. Keep it cohesive: Make sure the fonts share a similar mood or style. A sleek modern font won’t pair well with something overly decorative.

Combining Fonts - Typography in Graphic Design

For example, pairing a bold sans-serif headline with a light serif body text creates a nice contrast while keeping things harmonious.

Other Important Terms

Typography has its own language, and understanding these terms will help you fine-tune your designs:

Hierarchy

Hierarchy is about guiding the reader’s eye. It’s how you show what’s most important, what’s secondary, and what’s just supporting info. You create hierarchy through size, weight, and placement.

For example, a big, bold headline grabs attention first, followed by smaller subheadings, and then the body text. Without hierarchy, everything blends together, and the reader doesn’t know where to look.

Text Heirarchy - Typography

Leading

Leading (pronounced “led-ing”) is the space between lines of text. Too little leading, and the text feels cramped; too much, and it feels disconnected. The goal is to find a balance that makes the text easy to read.

A good rule of thumb is to set your leading at 120-150% of your font size. For example, if your font is 10pt, your leading should be around 12-15pt.

Leading - Typography

Tracking

Tracking is the overall spacing between letters in a word or block of text. Adjusting tracking can help you fit text into a specific space or create a certain mood.

For example, increasing tracking can make text feel airy and modern, while decreasing it can make it feel tight and urgent. Just don’t go overboard—too much tracking makes text hard to read, and too little can make it feel claustrophobic.

Tracking

Kerning

Kerning is similar to tracking but focuses on the space between individual letters. Some letter combinations (like “AV” or “To”) can create awkward gaps, and kerning fixes that.

Good kerning is invisible—when it’s done right, you don’t notice it. But when it’s off, it sticks out like a sore thumb. Pay extra attention to kerning in logos, headlines, and anything with large text.

Kerning

Putting It All Together

Mastering typography isn’t about memorising rules—it’s about developing an eye for what works. It’s about understanding how type interacts with space, how it communicates mood, and how it guides the reader.

Here’s a quick checklist to keep in mind:

  • Choose fonts that match the tone of your design.
  • Avoid overused or hard-to-read fonts.
  • Use hierarchy to guide the reader’s eye.
  • Pay attention to spacing (leading, tracking, and kerning).
  • Keep it simple and intentional.

And remember, typography is as much about feeling as it is about rules. Trust your instincts, experiment, and don’t be afraid to break the rules once you understand them.


You may also like:

Graphic Design Trends for 2025: A Comprehensive Look

Essential Tips for Designing Compelling eBook Graphics

The Power of Infographics: The Way to Turn Data into Visual Stories